Google has finally opened up their calendar system to sync with iCal and Mozilla Sunbird. That's good news for us out there who want to keep our calendars up to date wherever we are.
There is capability for real two-way sync of your online Gmail calendars with iCal. You can set up multiple calendars with what appears to be full iCal functionality, and have them "push" changes to Google.
- Open the iCal application by going to Finder > Applications > iCal
- From the iCal menu bar, select Preferences.
- Under the Accounts tab, click the "+" sign to add an account. (Do not select any checkboxes in the Accounts tab.)
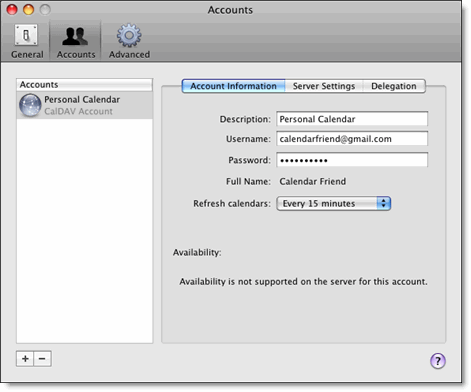
- In the pop-up screen, enter the following information:
Description: This will be the title for your CalDAV calendar list
Username: This is the complete email address you use with Google Calendar (including the part after the @ sign). If you're using Google Apps, be sure to enter your Google Apps email address.
Password: This is the password you use to sign in to Google Calendar - In the Server Options drop-down, enter [ https://www.google.com/calendar/dav/ [ your Google Calendar email address ] /user ] as your Account URL.
For example, if the email address used to access your Google Calendar is calendarfriend@gmail.com, the Account URL would be https://www.google.com/calendar/dav/calendarfriend@gmail.com/user
Be sure to use https in your URL, as an http address will not work.
- Click Add, and wait five to seven minutes while the initial sync takes place. (All subsequent syncs are instantaneous.)
- Sign in to Google Calendar.
- In the calendar list on the left, click the down-arrow button next to the appropriate calendar, then select Calendar Settings. (Alternatively, click on "Manage Calendars" at the bottom of the calendar list, then click on the name of the appropriate calendar.)
- In the Calendar Address section, locate the "Calendar ID."

- Copy the email address displayed after "Calendar ID:"
- Open the iCal application (Finder > Applications > iCal).
- Follow steps 2-4 from the Enable Google Calendar in iCal section above.
- Under Server Options, enter [ https://www.google.com/calendar/dav/ [ Calendar ID ] /user ] as your Account URL.
(e.g. https://www.google.com/calendar/dav/7oddefoo1ltvq0psfhbp8vs4gc@group.calendar.google.com/user)
To set up CalDAV support for Google Calendar in iCal, follow these steps:
Your Google Calendar will now appear in iCal's list of calendars, and iCal will sync any changes to and from Google Calendar.
Event information will automatically refresh every 15 minutes. You can change this interval by opening the iCal > Preferences > Accounts menu and selecting a new refresh interval under the "Refresh calendars" drop-down. Keep in mind you can also force a refresh by pressing the "Apple" and "R" keys at the same time.

Add secondary calendars
To view secondary calendars in Apple's iCal, follow the instructions below for each calendar you'd like to enable:


2 comments:
Hey Allen Works like a charm. Thanks!
Ah yes and so simple!
Post a Comment